


Creating a birdhouse is a rewarding project that combines creativity with practicality. This detailed guide will lead you through the process of building a charming birdhouse with a triangular roof, offering a safe haven for feathered friends.
Materials Needed:
Wood: Choose cedar, redwood, or pine for durability and weather resistance. You'll need:
1 piece for the base (approximately 6" x 6")
4 pieces for the sides (approximately 6" x 6")
2 pieces for the roof (approximately 6" x 10")
Optional: 1 piece for the entrance perch (approximately 1" x 4" x 4")
Hardware:
Wood glue
1 1/4" screws (20-30)
Small hinges (2)
Tools:
Measuring tape
Pencil
Saw (circular or hand saw)
Drill with drill bits
Hammer
Screwdriver
Safety glasses
Work gloves
Optional:
Stain or paint
Sandpaper
Step 1: Planning and Design
Choose a bird species: Different bird species have different preferences for birdhouse dimensions. Research the types of birds common to your area and select a design that suits their needs. For example, sparrows prefer smaller houses than bluebirds.
Determine the size: The ideal size for a birdhouse depends on the chosen species. Consult online resources or bird identification guides for specific recommendations.
Select a location: Consider the bird's needs when choosing a location for your birdhouse. Choose a spot that offers protection from predators and the elements, with easy access to a water source.
Step 2: Cutting the Wood
Base: Cut a 6" x 6" piece of wood for the base. This will form the bottom of the birdhouse.
Sides: Cut four 6" x 6" pieces for the sides. These will form the walls of the birdhouse. Adjust the height of these pieces according to the bird species you're targeting.
Roof: Cut two 6" x 10" pieces for the roof. These pieces will be angled to create a triangular roof.
Entrance perch: (Optional) Cut a 1" x 4" x 4" piece for the entrance perch. This will provide a landing spot for the bird.
Step 3: Assembling the Birdhouse
Constructing the walls: Use wood glue and screws to join the four side pieces to the base, forming a box. Ensure the joints are flush and secure.
Creating the entrance hole: Determine the appropriate size for the entrance hole based on the chosen bird species. Use a drill bit or jigsaw to cut the entrance hole on one of the side pieces.
Attaching the entrance perch: (Optional) If adding a perch, attach it to the side piece with the entrance hole, ensuring it is positioned below the entrance hole.
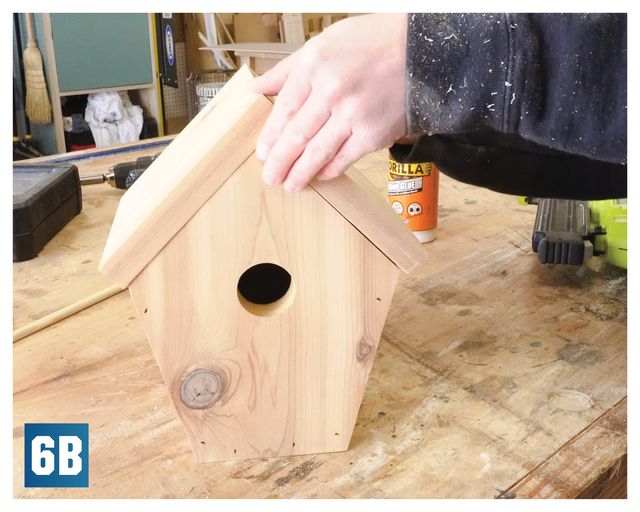
Attaching the roof: Apply wood glue to the top edge of the walls. Place the two roof pieces side-by-side, aligning them with the top edge of the walls. Secure the roof with screws.
Forming the triangular roof: Use screws to attach the two roof pieces together at their top edge, creating a triangle shape.
Adding hinges: (Optional) If desired, attach two small hinges to the back of the roof to allow for easy access to the interior for cleaning.
Step 4: Finishing Touches
Sanding: Sand the birdhouse with fine-grit sandpaper to smooth out any rough edges and create a polished finish.
Painting or staining: (Optional) Apply a water-resistant stain or paint to protect the wood and enhance the aesthetic appeal. Choose colors that are natural and blend well with the surroundings.
Adding a drainage hole: Drill a small drainage hole in the base of the birdhouse to prevent water from pooling inside.
Step 5: Installing the Birdhouse
Select a suitable location: Consider the bird's needs for protection from predators, the elements, and easy access to water.
Mounting the birdhouse: Use a bracket or screws to secure the birdhouse to a tree, pole, or building.
Placement: Position the birdhouse at a height of 4-6 feet above the ground, with the entrance hole facing away from the prevailing winds and direct sunlight.
Maintenance and Care:
Cleaning: Inspect the birdhouse regularly and clean it out at least once a year, preferably after breeding season. Remove any accumulated debris or nesting materials.
Repairs: Inspect for any damage, such as cracks or loose screws, and make necessary repairs.
Location: Monitor the birdhouse's location throughout the year to ensure it remains suitable for the birds.
Ethical Considerations:
Bird safety: Ensure that the birdhouse is built with the bird's safety in mind, using non-toxic materials and avoiding sharp edges.
Predator protection: Consider the potential for predators and take steps to protect the birds, such as installing predator guards or strategically placing the birdhouse.
Habitat conservation: Building birdhouses is a wonderful way to support local bird populations. Be mindful of the impact of habitat loss and encourage conservation efforts.
Conclusion
Building a birdhouse with a triangular roof is an enjoyable and rewarding project. By following these step-by-step instructions, you can create a safe haven for birds in your backyard while also enjoying the beauty of nature up close. Remember to choose a location that provides protection from predators and the elements, and to maintain your birdhouse regularly to ensure it remains a welcoming home for feathered friends.
No comments:
Post a Comment
Note: Only a member of this blog may post a comment.